Liunx环境下Nginx的部署上线
一、GCC G++开发类库
开始前,请确认gcc g++开发类库是否装好,默认已经安装
ububtu平台编译环境可以使用以下指令
1 | apt-get install build-essential |
centos平台编译环境使用如下指令
安装make:
1 | yum -y install gcc automake autoconf libtool make |
安装g++:
1 | yum install gcc gcc-c++ |
二、安装PCRE库
PCRE(Perl Compatible Regular Expressions)是一个轻量级的Perl函数库,包括 perl 兼容的正则表达式库。它比Boost之类的正则表达式库小得多。PCRE十分易用,同时功能也很强大,性能超过了POSIX正则表达式库和一些经典的正则表达式库。
- PCRE目前最新版本为8.43,可以在https://sourceforge.net/projects/pcre/files/pcre/ 这里进行下载。
没有安装wget,需要首先安装wget:1
yum -y install wget
1
wget https://nchc.dl.sourceforge.net/project/pcre/pcre/8.43/pcre-8.43.tar.gz
- 使用
tar -zxvf pcre-8.43.tar.gz进行解压。 - 运行
chmod -R 777 pcre-8.43对当前文件夹授予全部读写权限。 - 切换到/pcre-8.43目录下,运行
./configure进行pcre初始化配置,会在控制台打印出一大堆的输出信息。 - 执行make操作,进行编译。
1
2
3
4
5
6
7
8
9
10
11
12
13
14
15
16
17
18
19
20
21
22
23
24
25
26
27
28
29
30
31
32
33
34
35
36
37
38
39
40
41
42
43
44
45[root@server06 pcre-8.43]# make
rm -f pcre_chartables.c
ln -s ./pcre_chartables.c.dist pcre_chartables.c
make all-am
make[1]: Entering directory /opt/nginx/pcre-8.43
? CC? ? ? libpcre_la-pcre_byte_order.lo
? CC? ? ? libpcre_la-pcre_compile.lo
? CC? ? ? libpcre_la-pcre_config.lo
? CC? ? ? libpcre_la-pcre_dfa_exec.lo
? CC? ? ? libpcre_la-pcre_exec.lo
? CC? ? ? libpcre_la-pcre_fullinfo.lo
? CC? ? ? libpcre_la-pcre_get.lo
? CC? ? ? libpcre_la-pcre_globals.lo
? CC? ? ? libpcre_la-pcre_jit_compile.lo
? CC? ? ? libpcre_la-pcre_maketables.lo
? CC? ? ? libpcre_la-pcre_newline.lo
? CC? ? ? libpcre_la-pcre_ord2utf8.lo
? CC? ? ? libpcre_la-pcre_refcount.lo
? CC? ? ? libpcre_la-pcre_string_utils.lo
? CC? ? ? libpcre_la-pcre_study.lo
? CC? ? ? libpcre_la-pcre_tables.lo
? CC? ? ? libpcre_la-pcre_ucd.lo
? CC? ? ? libpcre_la-pcre_valid_utf8.lo
? CC? ? ? libpcre_la-pcre_version.lo
? CC? ? ? libpcre_la-pcre_xclass.lo
? CC? ? ? libpcre_la-pcre_chartables.lo
? CCLD? ? libpcre.la
? CC? ? ? libpcreposix_la-pcreposix.lo
? CCLD? ? libpcreposix.la
? CXX? ? ? libpcrecpp_la-pcrecpp.lo
? CXX? ? ? libpcrecpp_la-pcre_scanner.lo
? CXX? ? ? libpcrecpp_la-pcre_stringpiece.lo
? CXXLD? ? libpcrecpp.la
? CC? ? ? pcretest-pcretest.o
? CC? ? ? pcretest-pcre_printint.o
? CCLD? ? pcretest
? CC? ? ? pcregrep-pcregrep.o
? CCLD? ? pcregrep
? CXX? ? ? pcrecpp_unittest-pcrecpp_unittest.o
? CXXLD? ? pcrecpp_unittest
? CXX? ? ? pcre_scanner_unittest-pcre_scanner_unittest.o
? CXXLD? ? pcre_scanner_unittest
? CXX? ? ? pcre_stringpiece_unittest-pcre_stringpiece_unittest.o
? CXXLD? ? pcre_stringpiece_unittest
make[1]: Leaving directory /opt/nginx/pcre-8.43 - 运行 [root@server06 pcre-8.43]# make install,进行安装,至此PCRE安装完成。?
1
[root@server06 pcre-8.43]# make install
三、安装zlib库
http://zlib.net/zlib-1.2.11.tar.gz?下载最新的 zlib 源码包,使用下面命令下载编译和安装 zlib包:(本文参照下载文件版本:zlib-1.2.8.tar.gz?经过验证未发现这个版本,若想下载最新版本请打开上面网址。本文选择zlib-1.2.11.tar.gz?)
1 | cd /usr/local/src |
四、安装openssl(某些vps默认没装ssl)
1 | cd /usr/local/src |
五、安装nginx
Nginx 一般有两个版本,分别是稳定版和开发版,您可以根据您的目的来选择这两个版本的其中一个,下面是把 Nginx 安装到 /usr/local/nginx 目录下的详细步骤:
进入/usr/local的目录
1 | wget http://nginx.org/download/nginx-1.20.1.tar.gz |
注:这里可能会出现报错
ubuntu下:
1 | apt-get install openssl |
centos下:
1 | yum -y install openssl openssl-devel |
六、Nginx常用命令
(一)、启动
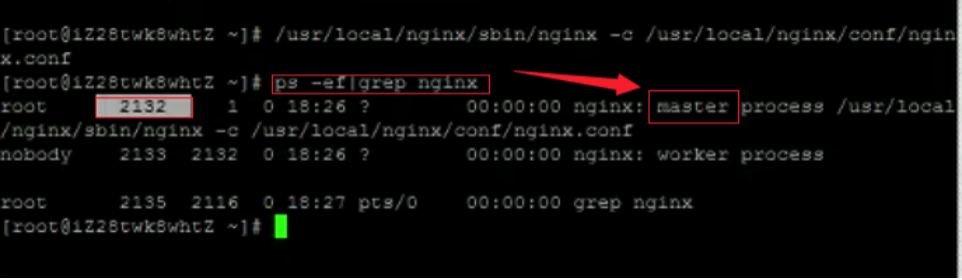
启动代码格式:nginx安装目录地址 -c nginx配置文件地址
例如:
1 | [root@LinuxServer sbin]# /usr/local/nginx/sbin/nginx -c /usr/local/nginx/conf/nginx.conf |
(二)、停止
nginx的停止有三种方式:
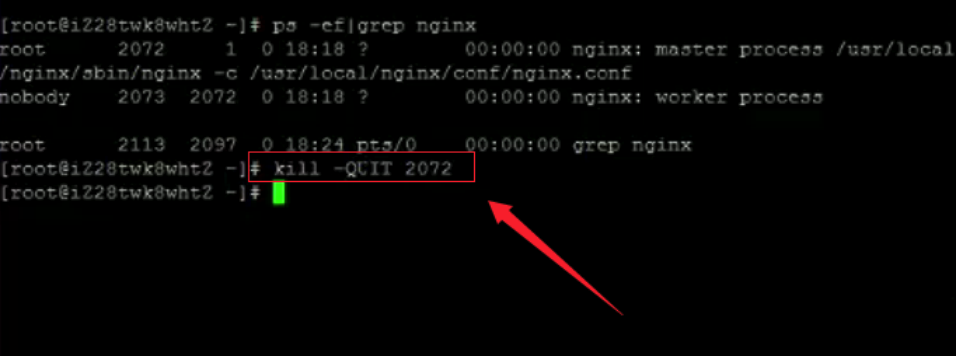
从容停止
1、查看进程号
1 | [root@LinuxServer ~]# ps -ef|grep nginx |

2、杀死进程
1 | [root@LinuxServer ~]# kill -QUIT 2072 |
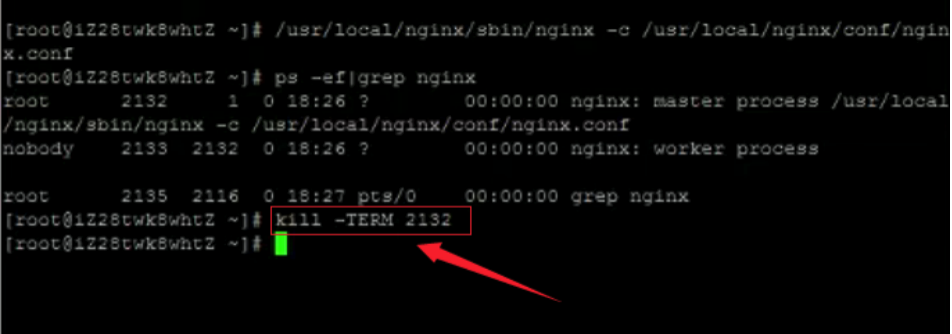
快速停止
1、查看进程号
1 | [root@LinuxServer ~]# ps -ef|grep nginx |
2、杀死进程
1 | [root@LinuxServer ~]# kill -TERM 2132 |
强制停止
1 | [root@LinuxServer ~]# pkill -9 nginx |
(三)、重启
1、验证nginx配置文件是否正确
方法一:进入nginx安装目录sbin下,输入命令./nginx -t
看到如下显示:
1 | nginx.conf syntax is ok |
说明配置文件正确!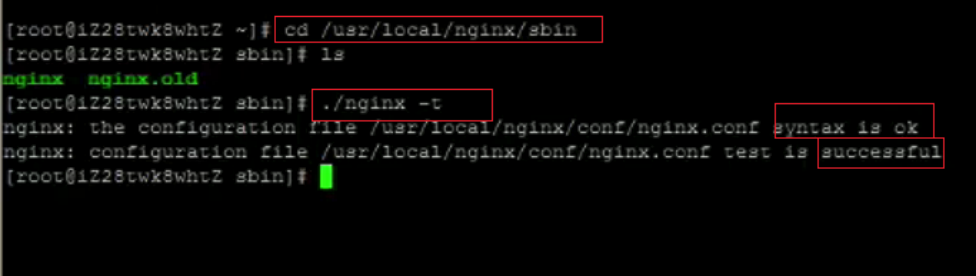
方法二:在启动命令-c前加-t
2、重启Nginx服务
方法一:进入nginx可执行目录sbin下,输入命令./nginx -s reload?即可
方法二:查找当前nginx进程号,然后输入命令:kill -HUP 进程号 实现重启nginx服务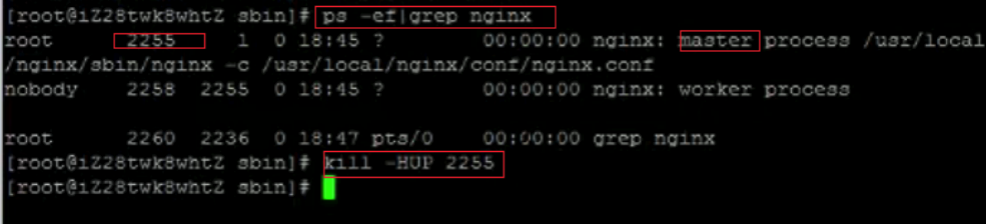
七、环境变量的配置
1:进入 vim /etc/profile 文件
2:添加配置 如下?
创建添加一个 PATH(PATH 和windows上配置环境变量差不多)
export 就是导入、启用的作用。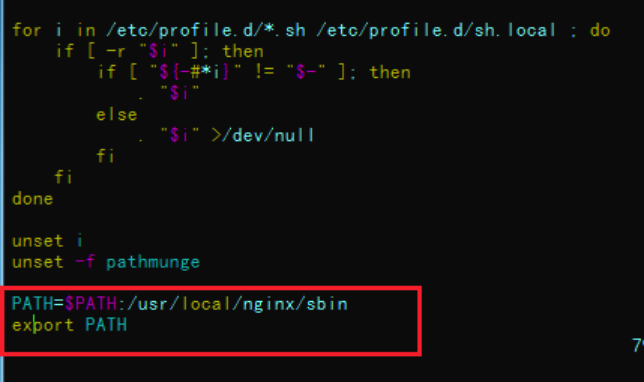
3:配置.bashrc文件,如下
这个时候,你只需要执行下面操作即可:
1 | vim ~/.bashrc |
然后最后一行添加
1 | source /etc/profile |
然后我们再来看看效果?
./nginx -s reload 发现没有出错
然后我就再次启动了 nginx? 表示也成功了。
八、配置文件
nginx.conf配置文件:
1 | worker_processes auto; |
vhosts下的配置:
1 | server { |
https配置:
1 | server { |
九、项目打包
1 | git clone http://192.168.0.205:8880/baosheng/jdzsoftware.git |
十、设置nginx开机自启动
第一步:进入到/lib/systemd/system/目录
1 | [root@iz2z init.d]# cd /lib/systemd/system/ |
第二步:创建nginx.service文件,并编辑
1 | vim nginx.service |
内如如下:
1 | [Unit] |
Description:描述服务
After:描述服务类别
[Service]服务运行参数的设置
Type=forking是后台运行的形式
ExecStart为服务的具体运行命令
ExecReload为重启命令
ExecStop为停止命令
PrivateTmp=True表示给服务分配独立的临时空间
注意:[Service]的启动、重启、停止命令全部要求使用绝对路径
[Install]运行级别下服务安装的相关设置,可设置为多用户,即系统运行级别为3
保存退出。
第三步:加入开机自启动
1 | systemctl enable nginx |
如果不想开机自启动了,可以使用下面的命令取消开机自启动
1 | systemctl disable nginx |
第四步:服务的启动/停止/刷新配置文件/查看状态
1 | systemctl start nginx.service 启动nginx服务 |
十一、常见问题
1、出现nginx: [emerg] bind() to 0.0.0.0:80 failed (98: Address already in use)?
可能是端口号被占用,切换到/usr/local/nginx/conf/目录下,更改nginx.conf下的端口号。也有可能是不小心nginx重启了多次,关闭nginx进程,重启即可。
关闭Nginx
使用 ps -ef|grep nginx 查看nginx的进程,可以看到nginx有两个进程:
1 | [root@linuxidc sbin]# ps -ef|grep nginx? |
快速停止nginx
kill - QUIT nginx 主进程号
停止nginx所有进程
1 | [root@linuxidc sbin]# pkill -9 nginx |
2、运行./configure进行初始化配置出错
运行./configure进行初始化配置。如出现下面的提示,说明该机器没有安装PCRE,而Nginx需要依赖PCRE,需要手动安装PCRE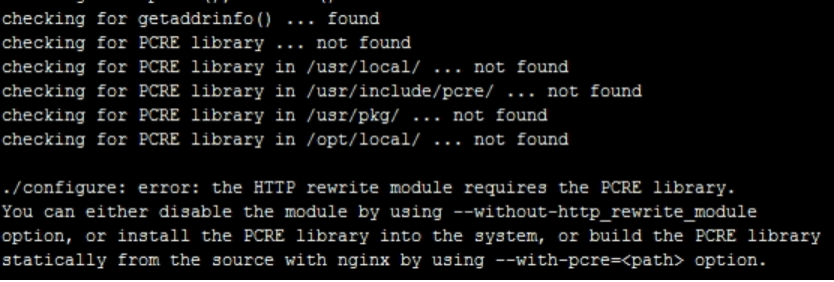
在安装完PCRE后,再次运行./configure进行初始化即可。注意这里生成的配置文件,尤其箭头所指的方向,是启动nginx时的路径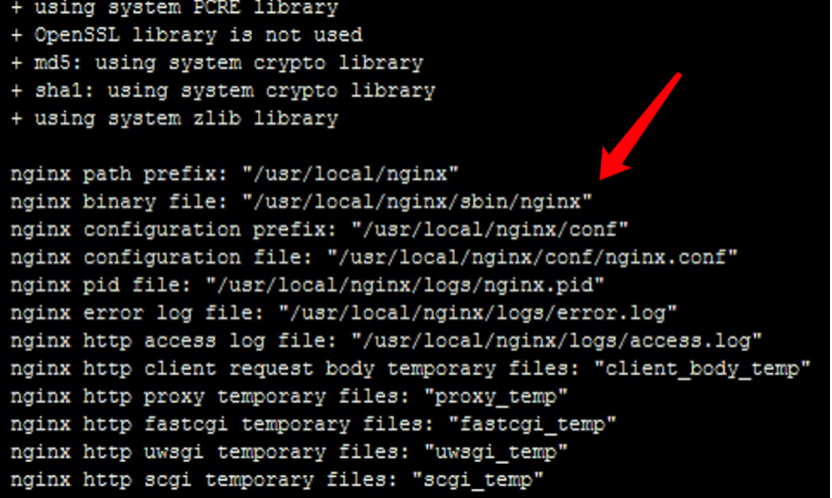
3、杀死进程后重启,出现ginx: [error] invalid PID number “” in “/usr/local/nginx/logs/nginx.pid” 这个错误
使用/usr/local/nginx/sbin/nginx -s reload
重新读取配置文件出错:
1 | [root@localhost nginx]/usr/local/nginx/sbin/nginx -s reload |
提示:
1 | nginx: [error] invalid PID number "" in "/usr/local/nginx/logs/nginx.pid" |
果然没有/usr/local/nginx/logs/nginx.pid 文件
解决方法:
1 | [root@localhost nginx]/usr/local/nginx/sbin/nginx -c /usr/local/nginx/conf/nginx.conf |
十二、离线安装GCC与GCC-C++
包下载地址:已测试可用
链接: https://pan.baidu.com/s/1j5-yzDbpqZZlyPMn33ooBA
密码: teta
把centos上传到linux服务器,进入centos目录
执行
1 | rpm -Uvh *.rpm --nodeps --force |
安装成功,查看gcc版本和g++版本,会看到详细的版本信息,离线环境下安装GCC和GCC-C++就完成了。
1 | gcc -v |