React技术栈整理
这里梳理下React技术栈需要的最小知识集,让你可以最短时间掌握React,Redux,React-Router,ES6的相关知识,更快的上手React”全家桶“。预计会有ES6、React、Redux、React-Router、Webpack,实时更新目录。
ES6知识
变量声明
let 和 const
不要用var,而是用let 和 const 。const声明一个只读的常量,let用来声明变量,const 和 let 都是块级作用域。
1 | const PLUS = 'PLUS'; |
模板字符串
模板字符串(template string)是增强版的字符串,用反引号(`)标识。它可以当作普通字符串使用,也可以用来定义多行字符串,或者在字符串中嵌入变量。
1 | const user = 'world'; |
默认参数
1 | function log(user = 'World') { |
箭头函数
ES6 允许使用“箭头”(=>)定义函数。
函数的快捷写法,不需要通过 function 关键字创建函数,并且还可以省略 return 关键字。
同时,箭头函数还会继承当前上下文的 this 关键字,即:函数体内的this对象,就是定义时所在的对象,而不是使用时所在的对象。
1 | // ES6 |
模块的 Import 和 Export
import 用于引入模块,export 用于导出模块。
1 | //导出默认, counter.js |
对象和数组
解构赋值
1 | // 数组 |
函数的参数也可以使用解构赋值。
1 | function add ([x, y]) { |
从作为函数实参的对象中提取数据
1 | function userId({id}) { |
属性的简洁表示法
1 | const foo = 'bar'; |
除了属性简写,方法也可以简写。
1 | const o = { |
扩展运算符
扩展运算符(spread)是三个点(…)。它好比 rest 参数的逆运算,将一个数组转为用逗号分隔的参数序列。
组装数组
1 | const a = [1, 2]; |
获取数组部分
1 | const arr = ['a', 'b', 'c']; |
还可收集函数参数为数组。
1 | function directions(first, ...rest) { |
代替 apply。
1 | function foo(x, y, z) {} |
组装对象
1 | const a = { x : 1, y : 2 } |
Promise
Promise 用于更优雅地处理异步请求。比如发起异步请求:
1 | fetch('/api/todos') |
定义 Promise 。
1 | const delay = (timeout) => { |
React知识
JSX
1 | const element = <h1>Hello, world!</h1>; |
在 JSX 中使用表达式
你可以任意地在 JSX 当中使用 JavaScript 表达式,在 JSX 当中的表达式要包含在大括号里。
1 | <h1>{title}</h1> |
JSX 嵌套
如果 JSX 标签是闭合式的,那么你需要在结尾处用 />, 就好像 XML/HTML 一样:
1 | const element = <img src={user.avatarUrl} />; |
互相嵌套
1 | const element = ( |
className
class 是保留词,所以添加样式时,需用 className 代替 class 。
1 | <h1 className="loading">Hello world</h1> |
Mapping Arrays to JSX
1 | <div> |
React组件3种形式
分别是 React.createClass, class 和 Stateless Functional Component(无状态组件)。推荐尽量使用最后一种,保持简洁和无状态。这是函数,不是 Object,没有 this 作用域,是 pure function。
createClass
1 | var MyComponent = React.createClass({ |
createClass写法是React官方反对的,会在React v15.*短期保留,在v16.0版本会被移除。
stateless function
1 | const MyComponent = () => ( |
class
1 | class MyComponent extends React.Component { |
PropTypes
使用PropTypes检查props
ES6写法
1 | import Proptypes from 'prop-types' |
ES 试验特性写法:
static是类的静态属性,不会被实例继承
1 | class Video extends React.Component { |
State
initialState的设定应放在constructor中
1 | export default class Header extends Component { |
也可以按照ES 试验特性写法
1 | export default class Header extends Component { |
destructuring & spread attributes
1 | class AutoloadingPostsGrid extends React.Component { |
React组件生命周期
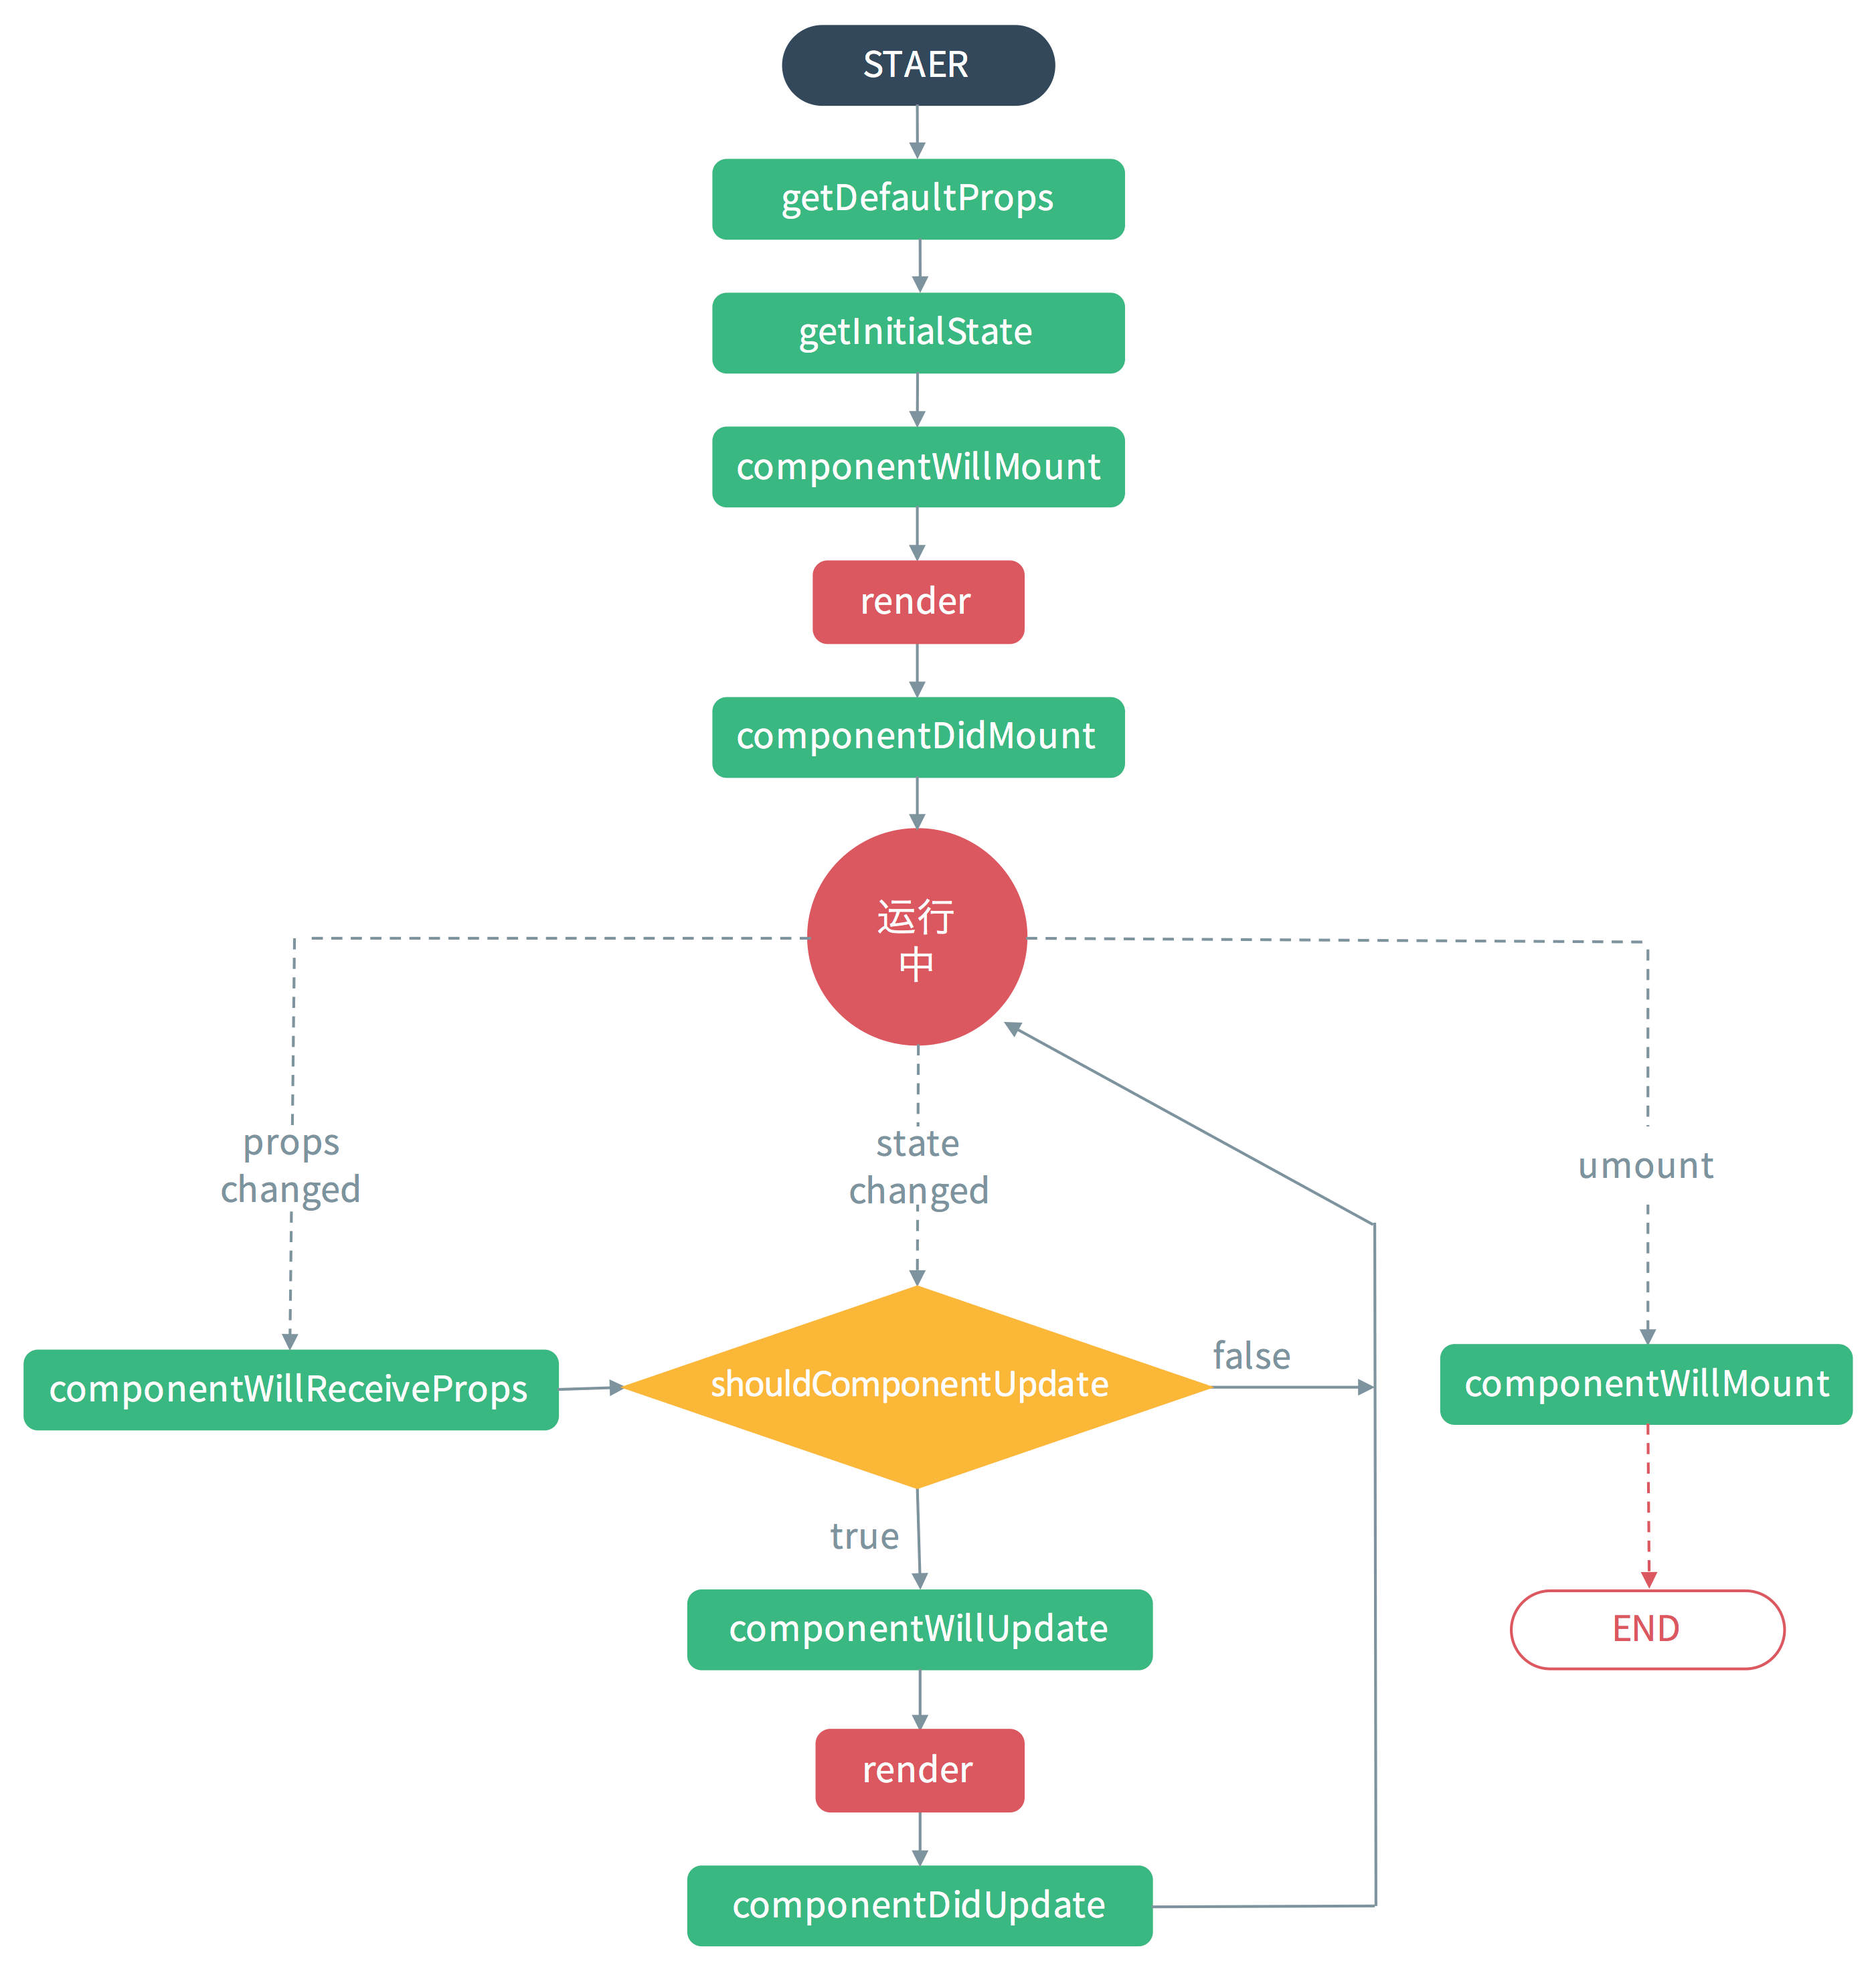
counstruct方法的作用:设置初始state或者绑定方法,在其他任何表达式前应调用super(props)
1 | constructor(props) { |
super(props):super方法提供this给其他表达式引用,提供props给其他表达式调用。
this.logger.bind(this)用来绑定this。可用箭头函数结合ES7的静态属性替代
1 | logger = () => { |
commentDidMount方法内可以设置state,触发组件更新重渲。
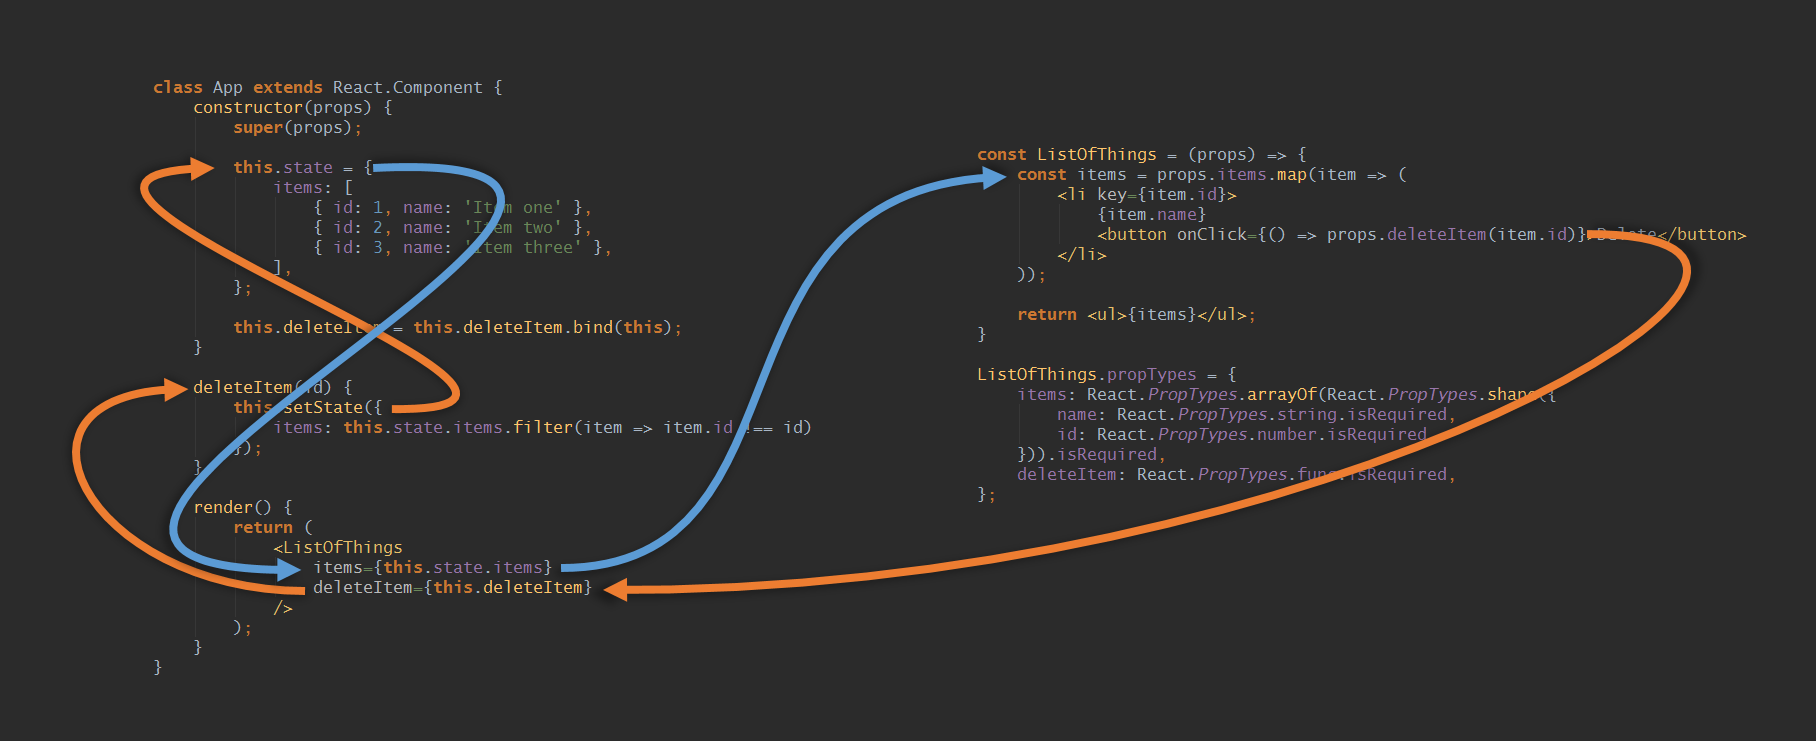
React数据向上和向下传递展示
Redux知识
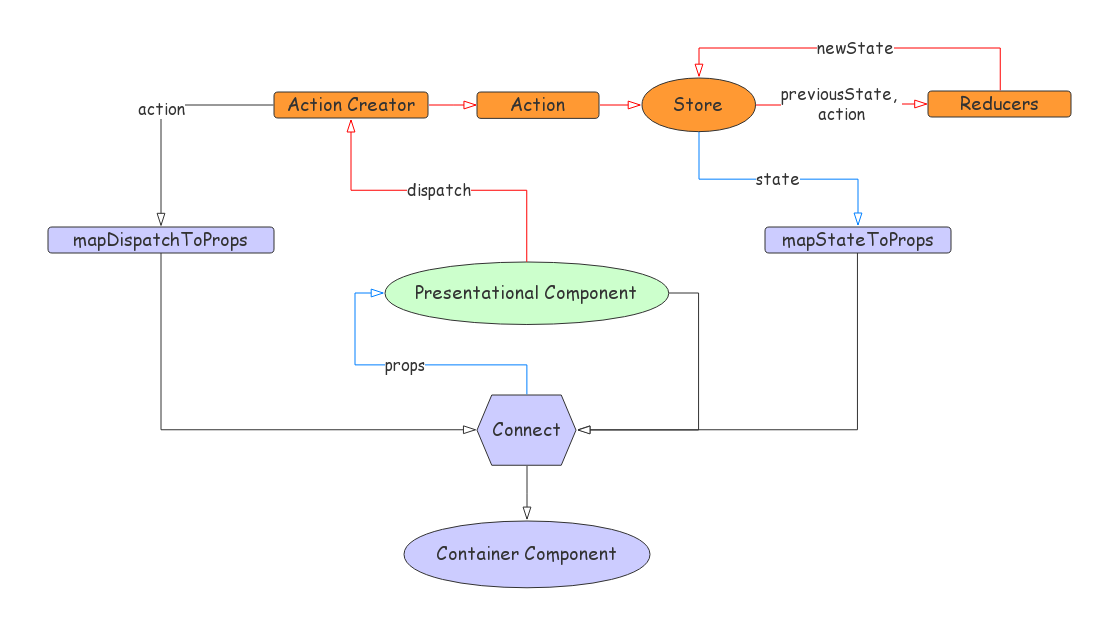
React Redux 数据流
通过这张流程图,我们可以更好的理解Redux和React直接数据如何流通,关系如何映射。
让我们一步步来了解图中的各个概念。
action & actionCreator
action creator 就是函数而已,负责构建一个 action (是的,action creator 这个名字已经很明显了)并返回它。通过几行简单的代码就可以解释清楚了!
1 | const actionCreator = function () { |
一般约定 action 是一个拥有 type 属性的对象。
1 | console.log(actionCreator()) |
reducer
Reducer 函数只是一个纯函数,它接收应用程序的当前状态以及发生的 action,然后返回修改后的新状态(或者有人称之为归并后的状态)。Reducer 函数是 action 的订阅者。
1 | const reducer = function (state = {}, action) { |
Store
以上,action描述“发生了什么”,而reducer根据action来更新state。但是他们两者之间是如何关联的呢?
不用担心,Redux 会帮你把action和reducer连接起来。
我们把 Redux实例称为store 并用以下方式创建:
1 | import { createStore } from 'redux' |
注意:在createStore时,需要给它传入一个 reducer 函数。
每当一个action发生时,Redux都能调用这个函数。往 createStore 传 Reducer 的过程就是给 Redux绑定 action处理函数(也就是Reducer)的过程。
接下来,试着在 Reducer 中打印一些 log
1 | const reducer = function (...args) { |
我们没有dispatch(分发)任何action,但是reducer被调用了!这是由于初始化应用state的时候,Redux dispatch 了一个初始化的 action ({ type: ‘@@redux/INIT’ })。reducer的入参为(state, action)。state还没有被初始化,自然为undefined。
如何读取store中的state?
Redux为我们提供了store.getState()方法。
1 | import { createStore } from 'redux' |
如何dispatch action?
我们需要使用store.dispatch(action)方法。
1 | // 接以上代码 |
combineReducers
combineReducer用于合并Reducers,并且合并对应的State。
1 | const userReducer = function (state = {}, action) { |
回过头来看看文章开头的数据流向图
View组件通过click等事件,dispatch一个(actionCreator返回的)action,通过Store把当前状态state和action传递给订阅者reducer函数,reducer返回一个新的状态存储在Store中,Store又把新的State传递给View组件触发组件更新。
为了将Redux和React联系到一起。就需要用到React-Redux这个库。
1 | import { connect } from 'react-redux' |
简单来说,mapStateToProps和mapDispatchToProps就是分别把Redux的state,和dispatch(action)映射到React组件中作为props。connect将展示组件(presentationalComponent)封装成高阶的容器组件(containerComponent)。state的更新意味着props更新。
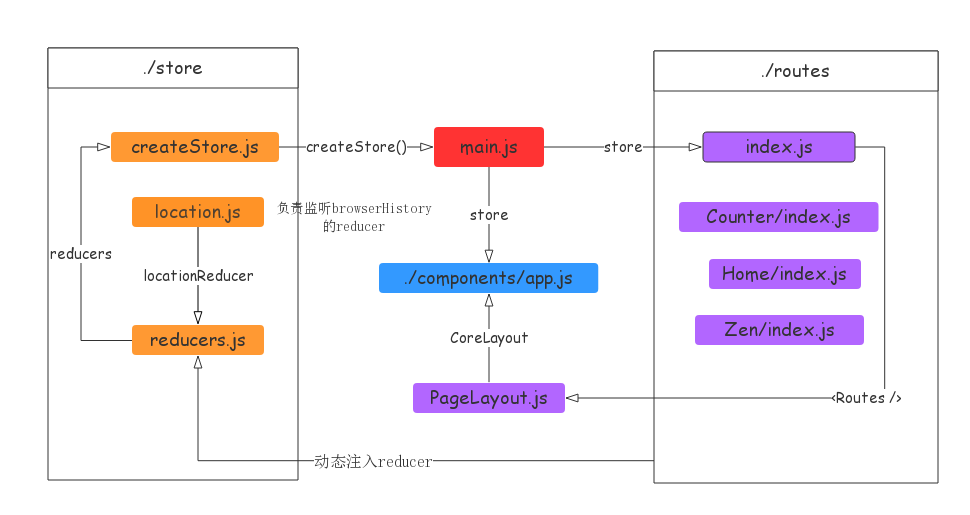
React脚手架构图
最后贴一张react脚手架架构图以作备用。