当我们在玩一个简单的网页游戏的时候,其流程通常会包含以下步骤:
1、 出现一个载入进度条,载入一些必须的图片、音频、字体等文件;
2、 显示主菜单,提示用户开始游戏;
3、 进入游戏主逻辑。在游戏过程中,当用户胜利或者失败,或是触发了某个按钮或者按键时,游戏会退出,显示主菜单。
上面所述的每一个步骤,在 Phaser 中都可以用一个状态(State)来表示。因此上面的三个状态可概括为:
1、 加载资源
2、 显示主菜单,需监听并响应用户输入
3、 进入游戏逻辑,需监听并响应用户输入
这三个状态可以进一步抽象为:
1、 加载资源
2、 创建主菜单界面元素(精灵、文字、图片等)、根据一定的规则和用户输入渲染界面
3、 创建主游戏界面元素(精灵、文字、图片等)、根据一定的规则和用户输入渲染界面
这里出现个问题,在第一步加载资源中显示的进度条的资源是怎么来的呢?所以,我们需要加一个“游戏启动”这个状态,用于游戏最基本的一些变量的初始化,以及载入进度条的加载。最终的状态变为:
1、 加载资源(进度条素材)
2、 加载资源(游戏必要的其他素材)
3、 创建主菜单界面元素(精灵、文字、图片等)、根据用户输入和一定的规则渲染界面
4、 创建主游戏界面元素(精灵、文字、图片等)、根据用户输入和一定的规则渲染界面
在这四个状态中,我们发现一个相同的部分:加载资源、创建游戏元素、根据用户输入和游戏规则渲染界面。在Phaser中,分别用这三个函数来表示:preload、create、update,也就是说,在一个State中,必须要包含preload、create、update三者中的一个或多个,这样才能构成一个完整的状态。实际上,在Phaser中还有render这个函数。Render用于渲染界面,是在游戏和插件的渲染之后再执行渲染,通常被用作后处理。Render这个函数平时用的很少,一般用于添加debug信息。状态已经定义好了,那如何对这些状态进行排序并顺序调用呢,在Phaser中,我们用状态管理器(StateManager)来管理状态。状态管理器包含了两个最常用函数add(key,state)和start(key),分别用于添加状态和启动状态。其中,参数key表示对应于状态state的键值,key与state需一一对应,这样,以后需要对某个状态进行操作时,只需要对key进行操作即可。
下面的框图展示了上面总结的四个状态与状态管理器的关系:
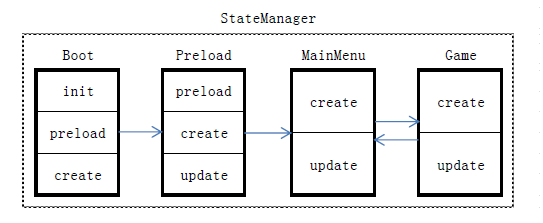
我们将四个状态分别命名为Boot,Preload,MainMenu,Game。其中,MainMenu和Game之间可相互跳转,当用户在主菜单界面上点击进入游戏,则进入 Game;当用户在游戏过程中胜利、失败或者按了某个按键,则退回到主菜单。
下面是源代码:
1
2
3
4
5
6
7
8
9
10
11
12
13
14
15
16
| window.onload = function() {
var game = new Phaser.Game(800, 600, Phaser.AUTO, 'container');
game.state.add('Boot', BasicGame.Boot);
game.state.add('Preloader', BasicGame.Preloader);
game.state.add('MainMenu', BasicGame.MainMenu);
game.state.add('Game', BasicGame.Game);
game.state.start('Boot');
};
var BasicGame = {
};
|
下面是四个状态的定义。
第一个状态:
1
2
3
4
5
6
7
8
9
10
11
12
13
14
15
16
17
18
19
20
21
22
23
24
25
26
27
28
29
30
31
32
33
34
| BasicGame.Boot = function(game) {
};
BasicGame.Boot.prototype = {
init: function() {
this.input.maxPointers = 1;
if (this.game.device.desktop) {
} else {
this.scale.scaleMode = Phaser.ScaleManager.SHOW_ALL;
this.scale.setMinMax(480, 260, 1024, 768);
this.scale.forceLandscape = true;
}
this.scale.pageAlignHorizontally = true;
this.scale.pageAlignVertically = true;
},
preload: function() {
this.load.image('preloaderBar', 'assets/preloader-bar.png');
},
create: function() {
this.state.start('Preloader');
}
};
|
第二个状态:
1
2
3
4
5
6
7
8
9
10
11
12
13
14
15
16
17
18
19
20
21
22
23
24
25
26
27
28
29
30
31
32
33
34
35
36
37
38
39
40
41
42
43
44
45
46
47
48
49
| BasicGame.Preloader = function(game) {
this.background = null;
this.preloadBar = null;
};
BasicGame.Preloader.prototype = {
preload: function() {
this.stage.backgroundColor = '#2d2d2d';
this.preloadBar = this.add.sprite(this.game.width / 2 - 100, this.game.height / 2,'preloaderBar');
this.add.text(this.game.width / 2, this.game.height / 2 - 30, "Loading...", {font: "32px monospace",fill:"#fff"}).anchor.setTo(0.5, 0.5);
this.load.setPreloadSprite(this.preloadBar);
this.load.image('titlepage', 'assets/titlepage.png');
this.load.image('bullet', 'assets/bullet.png');
this.load.spritesheet('enemy', 'assets/enemy.png', 32, 32);
this.load.audio('explosion', ['assets/explosion.ogg', 'assets/explosion.wav']);
this.load.audio('playerExplosion', ['assets/player-explosion.ogg',
'assets/player-explosion.wav']);
},
create: function() {
this.preloadBar.cropEnabled = false;
},
update: function() {
if (this.cache.isSoundDecoded('titleMusic') && this.ready == false)
{
this.ready = true;
this.state.start('MainMenu');
}
}
};
|
第三个状态:
1
2
3
4
5
6
7
8
9
10
11
12
13
14
15
16
17
18
19
20
21
22
23
24
25
26
27
28
29
30
31
32
33
34
35
36
37
38
39
40
41
42
43
| BasicGame.MainMenu = function (game) {
this.music = null;
this.playButton = null;
};
BasicGame.MainMenu.prototype = {
create: function () {
this.add.sprite(0, 0, 'titlepage');
this.loadingText = this.add.text(this.game.width / 2, this.game.height / 2 + 80, "Press Z or tap/click game to start", { font: "20px monospace", fill: "#fff" });
this.loadingText.anchor.setTo(0.5, 0.5);
this.add.text(this.game.width / 2, this.game.height - 90, "image assets Copyright (c) 2002 AriFeldman", {font:"12px monospace", fill: "#fff", align: "center"}).anchor.setTo(0.5, 0.5);
this.add.text(this.game.width / 2, this.game.height - 75, "sound assets Copyright (c) 2012 -2013 Devin Watson", {font: "12px monospace", fill: "#fff", align: "center"}).anchor.setTo(0.5, 0.5);
},
update: function () {
if (this.input.keyboard.isDown(Phaser.Keyboard.Z) || this.input.activePointer.isDown) {
this.startGame();
}
},
startGame: function (pointer) {
this.music.stop();
this.state.start('Game');
}
};
|
第四个状态:
1
2
3
4
5
6
7
8
9
10
11
12
13
14
15
16
17
18
19
20
21
22
23
24
25
26
27
28
29
30
31
32
33
34
35
36
37
38
39
40
41
42
43
44
45
| BasicGame.Game = function(game) {
};
BasicGame.Game.prototype = {
create: function() {
this.setupBackground();
this.setupPlayer();
this.setupEnemies();
this.setupBullets();
this.setupText();
this.setupAudio();
this.cursors = this.input.keyboard.createCursorKeys();
},
update: function() {
this.checkCollisions();
this.spawnEnemies();
this.enemyFire();
this.processPlayerInput();
if(…) {
quitGame();
}
}
quitGame: function(pointer) {
this.player.destroy();
this.enemyPool.destroy();
this.bulletPool.destroy();
this.shooterPool.destroy();
this.scoreText.destroy();
this.returnText.destroy();
this.state.start('MainMenu');
}
}
|
下面我们来看下 Phaser.js 中是如何对状态进行管理和调用的。Game初始化中,等设备准备好之后执行boot函数:
1
2
|
this.device.whenReady(this.boot, this);
|
Game.boot()中调用包装了浏览器动画绘制方法的 Phaser.RequestAnimationFrame:
1
2
3
|
this.raf = new Phaser.RequestAnimationFrame(this, false);
this.raf.start();
|
Phaser.RequestAnimationFrame.start()中会调用系统函数 window.requestAnimationFrame(需浏览器支持,如果不支持,则改为调用 window.setTimeout):
1
2
3
4
5
6
7
8
9
10
11
12
13
|
start: function () {
…
this._timeOutID = window.requestAnimationFrame(this._onLoop);
….
}
Phaser.RequestAnimationFrame._onLoop = function() {
……
this.game.update(Math.floor(rafTime));
this._timeOutID = window.requestAnimationFrame(this._onLoop);
……
}
|
在 Game.update 中调用了 updateLogic,在 updateLogic 中会对缩放、调试、世界、物理引擎、转改、插件、舞台进行更新:
1
2
3
4
5
6
7
8
9
10
11
12
13
14
15
16
17
18
19
20
21
22
23
24
25
26
27
28
29
30
31
32
33
34
|
Game.update(time) {
……
updateLogic(timeStep);
……
}
Game.updateLogic(timeStep) {
……
this.scale.preUpdate();
this.debug.preUpdate();
this.world.camera.preUpdate();
this.physics.preUpdate();
this.state.preUpdate(timeStep);
this.plugins.preUpdate(timeStep);
this.stage.preUpdate();
this.state.update();
this.stage.update();
this.tweens.update(timeStep);
this.sound.update();
this.input.update();
this.physics.update();
this.particles.update();
this.plugins.update();
this.stage.postUpdate();
this.plugins.postUpdate();
……
}
|
这里只是对一个简单游戏的状态管理进行分析,我们还可以这个演示程序进行优化,例如在游戏启动时只加载主菜单所需的资源,以提高游戏启动的速度。然后在每进入一关时,加载这一关所必须的资源。这样能更好的改善用户体验。